How Many Hours Does It Take to Replace a Serpentine Belt
Replacing a serpentine belt typically takes between 1 and 3 hours for most vehicles, depending on your model and experience level. The process involves releasing belt tension, removing the old belt, routing the new one, and checking tension. With the right tools and a clear diagram, many car owners can do this themselves and save on labor costs.
Replacing a serpentine belt is one of those maintenance jobs that sounds intimidating but is actually quite manageable. Whether you are a weekend mechanic or someone trying to understand a repair quote, knowing how many hours it takes to replace a serpentine belt helps you plan and budget. Most drivers are surprised to learn that this common repair often takes just one to three hours.
The serpentine belt is a single, long belt that powers multiple accessories in your engine. It drives the alternator, power steering pump, water pump, and air conditioning compressor. When it fails, you can lose power steering, your battery will stop charging, and your engine can overheat. Understanding the replacement timeline is the first step toward staying ahead of this important maintenance task.
In this guide, we will walk through everything you need to know about serpentine belt replacement time. We will cover the factors that affect duration, the tools you need, and whether you should attempt a DIY install or visit a mechanic. By the end, you will have a clear picture of what to expect.
Key Takeaways
- Average Time: Most serpentine belt replacements take 1 to 3 hours.
- DIY Friendly: If you have basic tools, you can save hundreds in labor costs.
- Tension Is Key: Proper belt tension prevents slippage and premature wear.
- Inspect Related Parts: Check the tensioner and pulleys while you are at it.
- Overheating Risk: A broken serpentine belt can cause serious engine damage, similar to how a bad timing belt can cause a car to overheat.
- Follow the Diagram: Always refer to your vehicle-specific routing diagram.
📑 Table of Contents
- What Is a Serpentine Belt and Why Does It Matter?
- How Long Does Serpentine Belt Replacement Actually Take?
- Tools and Materials You Will Need
- Step-by-Step Serpentine Belt Replacement
- Common Mistakes to Avoid During Replacement
- When Should You Call a Professional?
- How Much Does Serpentine Belt Replacement Cost?
- Final Thoughts
What Is a Serpentine Belt and Why Does It Matter?
The serpentine belt is the long, ribbed belt that snakes through multiple pulleys at the front of your engine. Unlike older vehicles that used several separate belts, modern cars use one belt to drive all major accessories. This design is simpler and more efficient, but it also means that one belt failure can take out multiple systems at once.
What Does the Serpentine Belt Do?
This belt connects to several critical components:
- Alternator: Charges the battery and powers electrical systems while the engine runs.
- Water Pump: Circulates coolant through the engine to prevent overheating.
- Power Steering Pump: Provides hydraulic assist for easy steering.
- Air Conditioning Compressor: Powers the AC system to keep you cool.
Because the serpentine belt handles so much, a worn or broken belt can leave you stranded. Regular inspection and timely replacement are essential to avoid unexpected breakdowns. Many mechanics recommend checking the belt condition every oil change, much like checking your air filter or tire pressure.
How Long Does a Serpentine Belt Last?
Most serpentine belts last between 50,000 and 100,000 miles. However, this varies based on driving conditions, climate, and the quality of the belt. If you frequently drive in extreme heat or tow heavy loads, your belt may wear faster. A good rule of thumb is to inspect the belt for cracks, glazing, or fraying every 10,000 miles.
How Long Does Serpentine Belt Replacement Actually Take?
The short answer is that how many hours it takes to replace a serpentine belt depends on several factors. On average, a professional mechanic will complete the job in 1 to 2 hours. A DIYer with some experience might take 2 to 3 hours the first time.
Factors That Affect Replacement Time
Several things can speed up or slow down the process:
Vehicle Make and Model: Some engines have easy access to the serpentine belt area. Others are tightly packed and require removing additional components to reach the belt. For example, a straightforward front-wheel-drive sedan usually takes less time than a cramped V6 SUV.
Experience Level: If you have done this before, you will be faster. A first-time DIYer should budget extra time for reading the routing diagram and working carefully. Watching a video tutorial beforehand can save a lot of trial and error.
Condition of the Old Belt and Tensioner: If the tensioner is stuck or the old belt is brittle, removing it can take longer. Rusty bolts or a seized tensioner pulley may require penetrating oil or extra patience.
Additional Repairs: If you also need to replace the tensioner, idler pulley, or water pump during the same service, the total time increases significantly. Many shops bundle these jobs together to save on labor.
Professional vs. DIY Time Comparison
Here is a realistic look at the time difference:
- Professional Mechanic: 1 to 2 hours. They have experience, proper tools, and access to service manuals.
- Experienced DIYer: 2 to 3 hours. You work at your own pace and may need to reference diagrams.
- First-Time DIYer: 3 to 5 hours. Learning the process takes extra time, but it is a great way to build skills.
Keep in mind that these are estimates. Your specific vehicle may be faster or slower. Always allow extra time, especially if you are trying this for the first time.
Tools and Materials You Will Need
Gathering everything before you start makes the job go much faster. Here is what you will need for a serpentine belt replacement:
- New serpentine belt: Make sure it matches your vehicle’s make, model, and year.
- Socket set and ratchet: You will need the right size to loosen the tensioner bolt.
- Serpentine belt tool or breaker bar: This specialized tool helps rotate the tensioner to release the belt.
- Torque wrench: To tighten bolts to the manufacturer’s specification.
- Flashlight: The engine bay can be dark, especially in older vehicles.
- Pen and paper or phone camera: To document the belt routing before removal.
- Safety glasses and gloves: Protect your hands and eyes from sharp edges and debris.
Having all your tools ready before you start prevents frustrating interruptions. This is the same mindset as preparing your car for a long road trip — gather everything upfront.
Step-by-Step Serpentine Belt Replacement
Now let us walk through the actual replacement process. While how many hours it takes to replace a serpentine belt varies, the steps themselves are fairly consistent across most vehicles.
Step 1: Document the Belt Routing
Before you do anything, take a clear photo of the belt routing. Most engines have a sticker showing the path, but it can be worn or hard to read. Draw a simple diagram or take multiple photos from different angles. This is the single most important step to get right, because an incorrectly routed belt will not function properly and could damage components.
Step 2: Release the Belt Tension
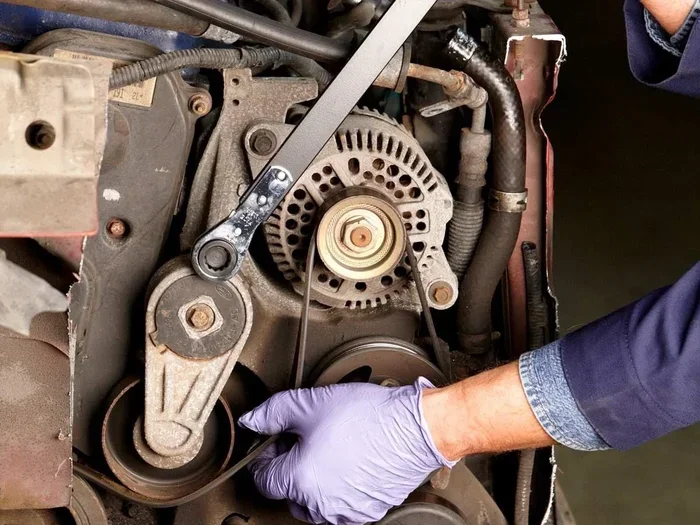
Locate the automatic tensioner. Insert your serpentine belt tool or breaker bar into the tensioner pulley bolt. Rotate the tensioner in the direction that relieves tension on the belt. While holding the tensioner, slide the old belt off one of the pulleys and slowly release the tensioner.
Never let the tensioner snap back uncontrolled. This can damage the tensioner or injure you. Always release it slowly and carefully.
Step 3: Remove the Old Belt
Once the tension is released, simply slide the old belt off the remaining pulleys. Inspect the old belt for signs of wear — cracks, fraying, glazing, or missing ribs. These are all indicators that the belt was due for replacement. Also check the pulleys for any unusual wear or noise.
Step 4: Inspect the Tensioner and Pulleys
This is a great opportunity to check the tensioner and idler pulleys. Spin each pulley by hand. They should rotate smoothly with no grinding, wobbling, or resistance. If any pulley feels rough or makes noise, replace it now. A failing tensioner can ruin a new belt quickly, so this inspection is well worth the extra few minutes.
Step 5: Route the New Belt
Refer to your photo or diagram from Step 1. Loop the new belt around all the pulleys except the tensioner. Then, use your tool to rotate the tensioner again, create slack, and slide the belt onto the tensioner pulley. Slowly release the tensioner and let it apply pressure to the new belt.
Double-check that the belt is seated correctly in every pulley groove. Run your fingers along the belt to make sure it is not twisted or off-track.
Step 6: Test the Installation
Start the engine and let it idle for a few minutes. Listen for any squealing or chirping sounds, which could indicate a misrouted belt or improper tension. Check that the alternator light goes off and that the power steering and AC work properly. Turn off the engine and do one final visual inspection of the belt seating.
Once everything looks and sounds good, you are done. Congratulations, you just saved yourself an hour or more of shop time.
Common Mistakes to Avoid During Replacement
Even experienced DIYers can make mistakes during serpentine belt replacement. Here are the most common errors and how to avoid them:
- Skipping the routing diagram: An incorrectly routed belt will not spin all accessories properly. Always document or print the routing before removal.
- Using the wrong belt: Serpentine belts come in different lengths and rib counts. Double-check the part number against your vehicle manual.
- Forgetting to check the tensioner: A worn tensioner will cause the new belt to fail prematurely. Always inspect it during replacement.
- Overtightening bolts: Use a torque wrench to avoid stripping threads or damaging pulley mounts.
- Ignoring unusual noises after installation: A new belt that chirps or squeals may be misaligned or the tensioner may need replacement.
Avoiding these mistakes can save you from having to redo the job or paying for additional repairs. Taking your time and doing it right the first time is always the best approach.
When Should You Call a Professional?
While serpentine belt replacement is a manageable DIY job for many people, there are situations where you should call a professional. If your engine bay is extremely tight and you cannot reach the tensioner comfortably, a mechanic has the tools and space to work efficiently. Similarly, if you notice additional problems — such as a failing alternator or a leaking water pump — it is often best to let a shop handle the full diagnosis.
If you are not comfortable working under the hood or do not have the necessary tools, there is no shame in visiting a trusted repair shop. The labor cost for serpentine belt replacement is generally reasonable, and you gain the peace of mind that comes with a professional job. You can also ask the mechanic to show you the old belt and explain what they found, which helps you learn for future maintenance.
Just as you would check whether does it matter where I get my oil changed, it is worth choosing a reputable shop for any major maintenance task. Ask for a written estimate before work begins, and do not hesitate to ask questions about the process.
How Much Does Serpentine Belt Replacement Cost?
The cost of serpentine belt replacement varies based on your vehicle and where you go. The belt itself typically costs between 25 and 75 dollars. If you visit a mechanic, labor charges usually range from 75 to 150 dollars, depending on your location and the shop’s hourly rate. This brings the total cost to roughly 100 to 225 dollars for most vehicles.
If you do it yourself, you only pay for the belt and any tools you do not already own. This can save you a significant amount of money, especially if you perform the replacement alongside other maintenance tasks like changing your oil or replacing your air filter.
Final Thoughts
How many hours does it take to replace a serpentine belt? For most vehicles, the answer is one to three hours, whether you go the DIY route or visit a mechanic. The key is preparation, patience, and following the correct procedure. A well-installed serpentine belt keeps your alternator, water pump, power steering, and AC running smoothly.
Do not wait until the belt breaks to address it. Regular inspection and proactive replacement prevent roadside breakdowns and expensive collateral damage. A failed serpentine belt can leave your car unable to run and, in some cases, can cause overheating that leads to serious engine problems, much like how a bad timing belt can cause a car to overheat when ignored.
Whether you tackle this job on your own or hand it to a professional, staying informed is the best strategy. Keep your maintenance records up to date, and your serpentine belt will serve you reliably for tens of thousands of miles.
Frequently Asked Questions
Can I drive with a worn serpentine belt?
It is not recommended. A worn belt can snap at any time, which will immediately disable your power steering, alternator, and water pump. Driving even a short distance with a failing belt risks overheating and electrical failure. Replace the belt as soon as you notice signs of wear.
What happens if the serpentine belt breaks while driving?
If the belt breaks while driving, you will lose power steering, your battery will stop charging, and the engine can overheat quickly because the water pump stops working. Pull over safely, turn off the engine, and call for roadside assistance. Continuing to drive with a broken belt can cause severe engine damage.
Is serpentine belt replacement a difficult DIY job?
For most people with basic mechanical skills, it is a straightforward job. The main challenge is finding the correct belt routing and releasing the tensioner. If you are comfortable using basic hand tools and following a diagram, you can likely complete the replacement in a few hours.
How can I tell if my serpentine belt needs replacing?
Look for visible cracks, fraying, glazing, or missing ribs on the belt. Listen for squealing noises when you start the engine or turn the steering wheel. Other signs include a dead battery, flickering lights, or the AC blowing warm air. Regular visual inspections help catch problems early.
Should I replace the tensioner at the same time as the serpentine belt?
It is a good idea to inspect the tensioner during belt replacement. If the tensioner shows signs of wear, makes noise, or does not hold proper tension, replacing it at the same time saves you from doing the job again soon. Many mechanics recommend this as a bundled service.
How much does it cost to replace a serpentine belt at a shop?
Most shops charge between 100 and 225 dollars total for serpentine belt replacement, including parts and labor. The belt itself costs 25 to 75 dollars, and labor runs 75 to 150 dollars depending on your location and vehicle. DIYers can do the job for the cost of the belt alone.